- 1. Douglas A-20C. Suggested kit: Revell A-20.
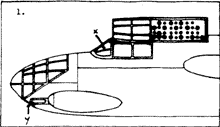

The
pilot's canopy includes the full-length hinged upper section which may be
displayed in the open position. To alter the fuselage for the open pilot's
hatch, cut the corresponding area away 1 mm above the horizontal panel line
marked on the kit fuselage. Most A-20s had the extra framelines marked X on
the drawing. Our replacement for the nose canopy does not include the lower
half of the bombardier's window (marked Y). Cut a piece from the Clear-Vax
backing sheet to fit this area, ensuring that the nose canopy fits snugly
in place. Also shown is the rear position with gunner's sliding section stowed.
Suggested references: Squadron/Signal In Action No.56; MAP Plan Pack - Douglas DB7/A-20 Boston/Havoc.
- 2. Douglas A-20H/K. Suggested kit: Matchbox A-20G/K.
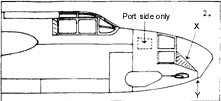
Nose canopy - We suggest
cutting the area marked X from the kit nosepiece to facilitate fitting the
Clear-Vax item. It will also be necessary to trim back the front of the kit
nosepiece marked Y. Note that the small window shown dotted is fitted to the
port side only; use the kit window for this area.
Pilot's canopy - This Clear-Vax item has been altered for better accuracy (shown shaded on the drawing).
Rear gun turret -
The gun slots have been narrowed down for better accuracy. Considerable detail will need to be added to this area.
- 3. Boeing B-29 Superfortress. Suggested kit: Airfix B-29.
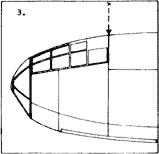
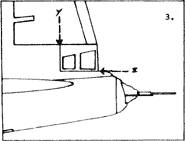
Main
canopy - In order to make fitting easier we suggest cutting off the kit upper
decking at the line marked X before fitting the entire replacement item. Make
sure that the sill lines on the kit parts are straight and free of flash.
The upper fuselage and side blisters fit as per the kit instructions.
Tail turret canopy - Cut away the top of the kit turret at the line marked Y, and straighten the bottom sill line Z. Take care when cutting the replacement turret canopy from the backing sheet as it is rather thin and fragile.
Suggested references: Squadron/Signal No.31, B-29 In Action; Detail & Scale Vol.10 B-29 Part 1, Vol.25 Pt 2.
- 4. Douglas A-26C Invader. Suggested kit: Airfix A-26B/C.

Main canopy - Assembly
of this and the rear section is pretty straightforward. Note the extra frameline
marked X found on some aircraft.
Nose canopy - Note that the entire lower section has been moulded clear, as it appears that not all aircraft had the solid section as per the kit nosepiece. We suggest cutting this piece off in order to fit the replacement item.
Suggested reference: Squadron/Signal No.36 A-26 Invader In Action.
- 5. Martin B-26 Marauder. Suggested kit: Airfix B-26B/C.
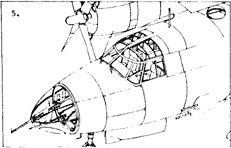
Nose
canopy - Note that the upper framing is internal and also note the position
of the fixed .50 cal machine gun usually fitted.
Pilot's canopy - This item has been moulded with the rear of the hinged upper sections included in case you wish to model these pieces opened up. The corresponding area will need to be removed from the kit fuselage.
Mid-upper gun turret - This simply fits on top of the kit turret ring. It may be necessary to widen the turret aperture in the fuselage a little.
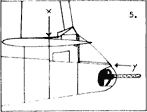
Rear gun turret - Cut away the kit turret area at the lines marked X and Y. It will also be necessary to cut out the corresponding area from the rear of the tailplanes. This is a tricky operation, and care is needed here. Also provided are the landing light
covers and astrodome.
Suggested references: Squadron/Signal No.50, B-26 Marauder In Action; B-26 Marauder at War, Freeman (Ian Allan); MAP Plan Pack B-26A & B Marauder.


