- 1. Dornier Do 17Z. Suggested kit:
Frog/Revell Do 17Z.
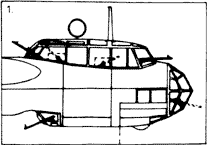
Note that the side
nose transparency has been moulded with part of the lower solid area included.
It may prove easier to fit this part in its entirety rather than cut out the
individual windows. Early Do 17Z aircraft only had three defensive machine
guns as shown solid. Many were upgunned with machine guns in the side windows
and nose as shown dotted.
Suggested references: Scale Models - Aircraft of the Battle of Britain (useful Do 17Z cutaway); Profile 164; 'Warplanes of the Third Reich' William Green (McDonald); Air Enthusiast 30 (Do 17E/F).
- 2. Focke Wulf Fw 200 Condor. Suggested
kit: Revell Fw 200C-4.
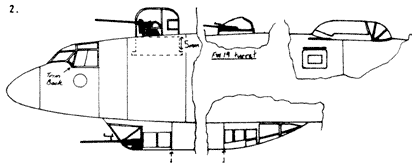
Alternative HDL151
and FW19 dorsal turrets are provided. To fit the HDL151 turret, cut the top
off kit part 6 as shown and replace with the Clear-Vax top. When fitting the
main pilot's canopy, trim back the shaded area on the port fuselage half as
shown. Cut the front and rear areas from the kit gondola (part 41) and fit
the Clear-Vax items in place. We suggest replacing the kit gun barrels, which
are far too thick. The rear dorsal canopy has been widened for greater accuracy.
Suggested reference: Profile 99.
- 3. Heinkel He177. Suggested kit: Airfix
He 177A-5.
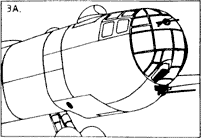
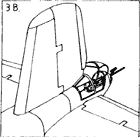
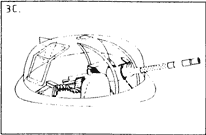
Notice how the upper
cabin windows have been altered to a flatter section and that the bombsight
window has been repositioned lower down. To fit the upper cabin windows, cut
off the lugs moulded onto the fuselage and replace with the entire Clear-Vax
upper section. The kit dorsal turret is underwidth, as is its mounting, which
will need to be opened to 12.5 mm diameter to fit the Clear-Vax replacement
turret. The turret drawing illustrates how the clear gun slot was folded down
to meet the gun shield. Carefully cut this area and bend the plastic slot
down as on the drawing. The rear turret drawing shows the gunner's escape
hatch open.
Suggested references: Profile 234; AirInternational April 1975.
- 4. Do 17E/F. Suggested kit: Airfix
Do 17E/F.
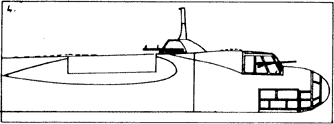
Only the main production
canopy with machine gun position has been provided. It is applicable to both
versions. Remove the moulded bulge aft of this canopy and the hump over the
rear wing/fuselage joint (shown dotted).
- 5. Junkers 88A-1. Suggested kits: Italaerei
Ju 188, Airfix Ju 88A, Revell Ju 88A-4.
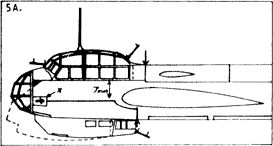
If using the Italaerei Ju 188 (Fig.5A) the fin and rudder, tailplanes, wingtips
and engine nacelles will need alteration. Using the drawing as a guide, cut
away the kit nose at the lines arrowed. The dotted lines indicate the kit
outline. Small triangles of plastic (shown shaded) will need to be added and
then sanded round in order to fit the nose transparency. The Bola underside
machine gun position is of the later type; the early mounting is supplied
separately. In order to minimise overthinning of the plastic, only half of
the small nose windows marked X are moulded. We suggest cutting out and fitting
correct-size windows from the backing sheet to accurately portray these. If
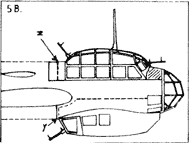
using the Airfix kit (Fig.5B) the wingtips will need shortening. The dotted
line indicates the kit outline. When fitting the main canopy it may prove
easier to cut the rear part at the line marked Z. Cut away the kit upper nose
decking shown shaded. Replace the kit gondola (part 9) after trimming back
the kit fuselage to the line marked Y.
Suggested references: The best reference for the Ju 88A series is
Aerodata International No.9 which has detailed 1/72 scale plans. Squadron/Signal In Action No.85 is also very useful.
- 6. Arado Ar 234B. Suggested kit: Frog/Revell
Ar 234B/C.
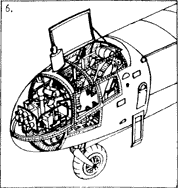
Although the Clear-Vax
parts may be cut out to fit the solid plastic kit parts 8 and 9, we suggest
using the Clear-Vax parts in their entirety. Considerable interior detail
will need to be added whichever method is used. Please note that all the cockpit
framing is internal and that only the rivet heads are visible on the outside.
Suggested reference: Monogram Close-Up No.23.


