- 1. Avro Anson. Suggested kit: Airfix Anson Mk.I.

Cut off the entire
fuselage top at the lines marked X. The front of our replacement canopy includes
an improved forward deck. The rearmost fuselage windows are not included,
for reasons of strength. We suggest fabricating these windows from the excess
plastic around this canopy set. The dark lines indicate internal framing.
The gun turret canopy simply fits on to the kit turret base.
Suggested
references: Scale Aircraft Modelling, Dec 1987.
- 2. Fairey Battle. Suggested kit: Airfix Battle Mk.I.

In order to fit the
replacement rear canopy, carefully cut away the shaded area on the kit fuselage.
The rear of the pilot's sliding section is designed to overlap the rear piece.
Suggested references: Scale Aircraft Modelling, Oct 1986; Scale Models
International, March 1984.
- 3. Handley Page Hampden. Suggested kit: Airfix Hampden Mk.I.
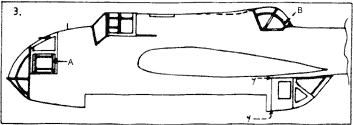
Join the two-piece
nose canopy together before fitting it to the fuselage. Note the nose machine
gun and the extra framing marked A. This framing was not found on all aircraft.
The dorsal turret had two styles of rear framing, curved or straight as marked
B. The kit upper decking should be altered to match the dotted line. In order
to fit the lower turret, carefully cut away the kit at the lines marked Y.
Suggested references: Scale Models International, Sept 1986; Scale
Aircraft Modelling, Feb 1987; Profile 58.
- 4. Bristol Blenheim Mk.I. Suggested kit: Frog Blenheim Mk.I/IF.
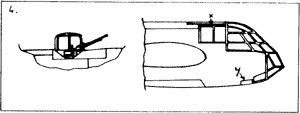
Carefully cut the small
projections marked X off the kit fuselage. This enables the entire Clear-Vax
main canopy to fit neatly. An extra bomb aimer's window marked Y needs to
be cut from the starboard fuselage half. The semi-retractable dorsal gun turret
is supplied in the "up" position. The kit turret will need its top cut off
at the appropriate point for replacement by the Clear-Vax item. Be particularly
careful when cutting out and handling the turret piece as it is very thin
and easily damaged.
- 5. Bristol Blenheim Mk.IV. Suggested kit: Airfix Blenheim Mk.IV.
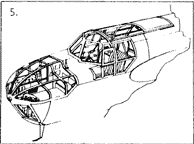
The drawing shows the
pilot's upper hatch open. Assembly follows similar lines to the Blenheim Mk.I.
Note that the Clear-Vax main canopy represents the early-style canopy, not
the later canopy with side blisters and chin turret.
Suggested references:
Squadron/Signal In Action No.88; Profile 93 (Blenheim I); Profile 218 (Blenheim
IV).
- 6. De Havilland Mosquito. Suggested kit: Matchbox B.IX.

The main canopy represents
that fitted to the B.IV and B.IX versions. Use the kit small nose windows.
Suggested references: Profile 209 (Mosquito Mk.IV); MAP Plan Pack,
DH 98 Mosquito Mks II, IV & VI.
- 7. Vickers Wellington Mk.X. Suggested kit: Matchbox Wellington Mk.X/XIV.
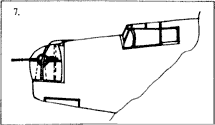
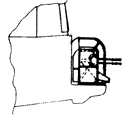
Be extremely careful when cutting out and handling the nose turret as it is
very thin. It is not necessary to cut out the gun traverse slots, just drill
holes in the desired position for the gun barrels. In order to make the turrets
swivel, cut away the kit turret bases and fit to them the Clear-Vax uppers.
Care is also needed when cutting out the rear gun turret, particularly around
the gun traverse cut-outs. Use the kit side windows.
Suggested references:
Squadron/Signal In Action No.76; Scale Models International, June 1984 &
1986.
- 8. Armstrong Whitworth Whitley. Suggested kit: Frog/Novo Whitley Mk.V.
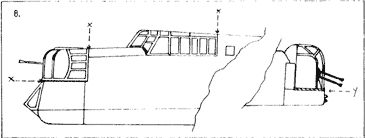
Using the drawing as
a guide, cut away the nose and upper fuselage decking at the lines marked
X. It is not necessary to cut a slot for the nose machine gun, just drill
a hole in order to fit the machine gun from the inside. The kit rear fuselage
is far too narrow in plan views; widen it with a wedge 3 mm wide at the extreme
rear end. Also cut away the shaded area marked Y. Considerable detail needs
to be added to the inside of the turret. Careful study of photographs of FN20
turrets (also used on the Lancaster, Wellington and Stirling) should help
with detailing.
Suggested references: Profile 153; AirEnthusiast No.9,
Feb-Mar 1979; Scale Models International, August 1986.


