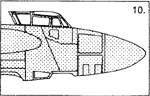
- 1. Macchi M.C. 202. Suggested kit: Hasegawa MC 202.
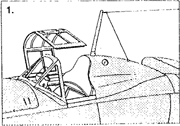
The Clear-Vax canopy
directly replaces the kit item.
Suggested references: Squadron/Signal In Action No.41; Profile 28; Modelaid No.13; Replic 18, February 1993.
- 2. Fiat G. 50. Suggested kit: Airfix Fiat G 50.

The Clear-Vax canopy
directly replaces the kit item. Note on the drawing the side windows that
slide up and down like car door windows. Fabricate these windows from clear
plastic if required.
Suggested references: Profile 188; Aviation News Plan 12/24; Air International, May & June 1988.
- 3. Macchi M.C. 200. Suggested kits: RCR Models MC 200, Revell MC 200.
The Clear-Vax canopy
directly replaces the kit items. Some trimming of the window sills of the
RCR kit will be necessary for a tidy fit.
Suggested references: Argus Specialist Publications Plan 3054; Profile 64.
- 4. Macchi M.C. 205. Suggested kit: Supermodel MC 205.
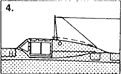
The dotted line on the
drawing shows the inaccurate outline of the rear fairing, which must be corrected
in order to fit the Clear-Vax canopy. Note also that the kit window sill is
1 mm too deep.
- 5. Cant Z.1007 Bis. Suggested kits: Supermodel Z 1007 Bis Monoderiva & Bideriva.
The Clear-Vax canopy
directly replaces the main kit items. Some trimming of the right fuselage
half at the windscreen join will be necessary for a neat fit. Replace the
side windows with thin clear acetate or styrene.
Suggested references: Modelaid No.7; Cant 2506 / Cant Z1007 (Mucchi Modena); Aviation News Plan 8/13.
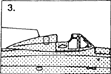
- 6. Fiat BR. 20M. Suggested kit: Italeri Fiat BR 20/20M.
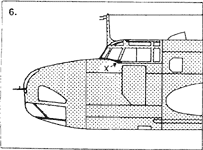
In order to fit the
pilot's canopy, carefully trim away the shaded area marked 5 from each fuselage
half. Before fitting the small clear fairing aft of the pilot's canopy, cut
away the corresponding area from the fuselage. As it is impractical for us
to include the entire nose area, only the bomb aimer's section is provided.
The top of the mid-upper turret has been altered in width and profile for
better accuracy. Cut the top off the kit turret in order to fit the Clear-Vax
replacement. We suggest replacing the kit side windows with clear acetate
or styrene.
Suggested references: Profile 110; Replic No.24, Aug 1993; Aviation News Plan 10/12.
- 7. Caproni Ca. 311/313. Suggested kits: Italeri Ca 311 & Ca 313/314.
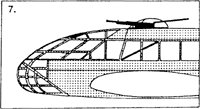
The Clear-Vax canopies
directly replace the kit nose/pilot's canopy and dorsal turret. We suggest
replacing the kit side windows with thin clear acetate or styrene.
Suggested references: Air Enthusiast, July 1971; Aviation News Plan 10/7.
- 8. Reggiane Re. 2000. Suggested kit: Supermodel Re 2000.
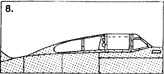
The Clear-Vax canopy
represents the early-style canopy with clear rear fairing. This piece has
been lowered and lengthened for better accuracy. Some aircraft carried extra
frame lines on the sliding section, as shown dotted.
Suggested references: Profile 123; 'Re 2000' by Sergio Govi (Giorgio Apostolo Editore).
- 9. Nardi F.N. 305. Suggested kit: RCR Models FN 305.
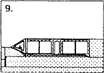
The Clear-Vax canopy
directly replaces the kit item.
- 10. Breda Ba. 88. Suggested kit: Vami Models Ba 88.
The Clear-Vax canopies
directly replace the kit items.
Suggested reference: Aviation News Plan 9/12.
- 11. I.M.A.M. Ro. 37/Ro.37 Bis. Suggested kit: Airmodel Ro 37/37 Bis.
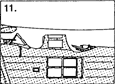
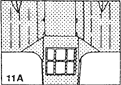
The
Clear-Vax canopies replace the pilot's windscreen and observer's top canopy.
We suggest replacing the kit side windows with clear acetate or styrene. Figure
11a shows the underside of the aircraft, which was fitted with windows in
the position shown. Carefully cut this area away and replace with clear acetate
or styrene.
Suggested reference: I.M.A.M. Ro 37 (Mucchi Modena).
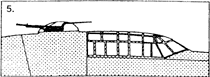
- 12. Reggiane Re. 2005. Suggested kit: Modelland Re 2005.
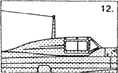
The Clear-Vax canopy
directly replaces the kit item.
Suggested references: Profile 244; 'Re 2002/2005' by Sergio Govi (Giorgio Apostolo Editore).
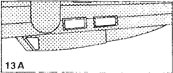
- 13. Savoia Marchetti S.M. 79. Suggested kit: Airfix SM 79.
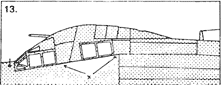
In
order to fit the Clear-Vax canopy, cut away the kit fuselage from aft of the
pilot's canopy to the dorsal gun position as marked 5. Then fit the canopy
in its entirety. A little filler will be needed in the area of the kit side
window position. Please note that the cross section and profile of the canopy
and dorsal hump have been altered considerably for better accuracy. Use the
kit side windows and gondola transparency, noting that the front of this item
is solid not clear, as shown in Figure 13A.
Suggested references: Squadron/Signal In Action No.71; Profile 89; Replic, 19 March 1993.
General references
The following titles are recommended as a source of further information:
- Regia Aeronautica, vol. 1 & 2 (Squadron/Signal Publications)
- Italian Air Force Camouflage in World War II, by Nino Arena (Mucchi Modena)
- Camouflage and Markings, Italian Air Forces 1935-45 (Modelaid).
Other items
We also highly recommend the following etched-brass interior detail sets to further enhance your models:
- RCR ModelsS sets 02 Fiat BR 20M, 03 Cant Z 1007, 04 Caproni Ca 313/4, 05 Macchi MC 200
- Eduard sets 051 MC 202, 063 & 064 SM 79, 077 Fiat G 50
- Airwaves set 72-67 MC 202.